Showing posts with label fun projects. Show all posts

Monday, December 10, 2012

Chapter 14: Indian Camp

"Pa wondered where the Indians had gone. He said they had left their little camp on the prairie. And one day he asked Laura and Mary if they would like to see the camp.

Laura jumped up and down and clapped her hands, but Ma objected.

"It is so far, Charles," she said. "And in this heat."

Pa's blue eyes twinkled. "This heat doesn't hurt the Indians and it won't hurt us," he said. "Come on, girls!"

Summer has come to the prairie. The wind is hot and the prairie grasses turn yellow under the sky. Pa wonders where the Indians have gone. They have left their little camp on the prairie, and one day Pa asks if Mary and Laura would like to go see it.

Laura jumps up and down in excitement, but Ma is worried that the trip is too much for her little girls. Pa says they will be fine, and soon they start out. Jack trots on ahead, for Pa said he could come today, then comes Pa, and after Pa come two very happy girls.

On they walk into the vast prairie. At last they dip down into the little hollow where the Indians had camped. Laura can't see the house anymore, but she knows it's there. Pa and the girls walk around looking at things. Laura sees the ashes from the Indian campfires, the bones scattered around where Indian dogs had chewed on them, and holes in the ground where the tent-poles had been. There are tracks from moccasins criss-crossing the ground.

Pa shows them how the Indians cooked their food over the campfire. And it is by the fire that Laura makes a wonderful discovery. There---right there in the dust----Laura finds a blue bead glittering. Soon Mary finds a red one. Then Laura and Mary hunt and hunt, filling their little hands with beads.

When it is time to go, Pa ties the beads in his handkerchief, Laura's in one corner and Mary's in the other. The sun is low in the sky and Pa sets a quick pace across the prairie. It is a long way home, and Pa carries Laura on his shoulder when she gets tired. But at last they reach home and find supper cooking on the fire and Ma setting the table.

The girls want Ma to look at the pretty beads they found, and she carefully unties the handkerchief. The beads are so pretty shining in the firelight. Laura points to her pile. "These are mine," she says.

"Carrie can have my beads," Mary says sweetly.

Ma waits to hear what Laura will say. Laura doesn't want to say anything. She wants to slap Mary and keep her beads. But at last she hangs her head and says, " Carrie can have mine, too."

"Those are my unselfish good girls," Ma says.

Ma gives Laura and Mary each a string, and they sit side by side and make a pretty necklace for Carrie. Perhaps Mary feels sweet and good inside, but Laura doesn't. But Laura feels a little better when she sees how happy Carrie is with her necklace.

Thoughts: 
Poor Laura. It is hard to have an older sister, particularly one with an unfortunate habit of perfection. Trust me on this. If only Laura and Mary had known how to make paper beads they wouldn't have had to worry about running out of Indian beads. Then they could have worried about running out of paper!

It's hard to imagine, in this crazy modern age where babies get ipads to play with, and little girls shed glitter wherever they go, what it must have been like back then. Think of a kid----any kid you know---and imagine what would happen if you gave them a handful of beads for Christmas. Think you'd get wonder, delight, and surprise? I doubt it.

But for Laura and Mary, this one little event made a memory they cherished their entire lives. I think that's a better deal than a Baby Ipad.

Id never made paper beads before this, so I looked up a handy instructional on the internet. Not to ruin the surprise, but this is a FUN activity. It's pretty easy if your fingers will cooperate, and you just can't get any cheaper than this for supplies. It would make a great activity for older girls who need something to do with their girly fingers besides texting interminably.

http://www.instructables.com/id/How-to-Make-Paper-Beads/

The instructions were posted by a group in Uganda that makes and sells just beautiful paper beads. The instructions are easy to follow and it has pictures to go with it. Very nice, and the projects they make are impressive.

But enough about them....I'm going to give you directions, too, just because I can.


Step 1: Select your paper. You can make very attractive and colorful beads using magazine pages, but I used patterned paper like you'd use for scrapbooking.

Step 2: Mark your paper for cutting. Here is where a visit to the other site might come in handy. It's very simple once you get the hang of it, but they have a nice graphic to illustrate.

Decide on the width of your bead. To make a bead 2 centimeters long, measure in from the edge of the paper 1 centimeter. Then draw a line from that back up to the top corner. This will give you a long, narrow triangle. It's a scrap piece.

Now go to the top of the page and measure 2 centimeters and mark it. Draw a line from the mark at the bottom of the page (the 1 centimeter mark) up to the 2 centimeter mark. Got that? You should have a long, narrow triangle shape. You can measure as many more as you want by measuring 2 centimeters over from the point of each triangle.

You can make beads of any size you want. The trick is to measure half the distance in from the edge the first time and then the full distance from then on.

I also found a pencil works better because the black lines show from a pen.

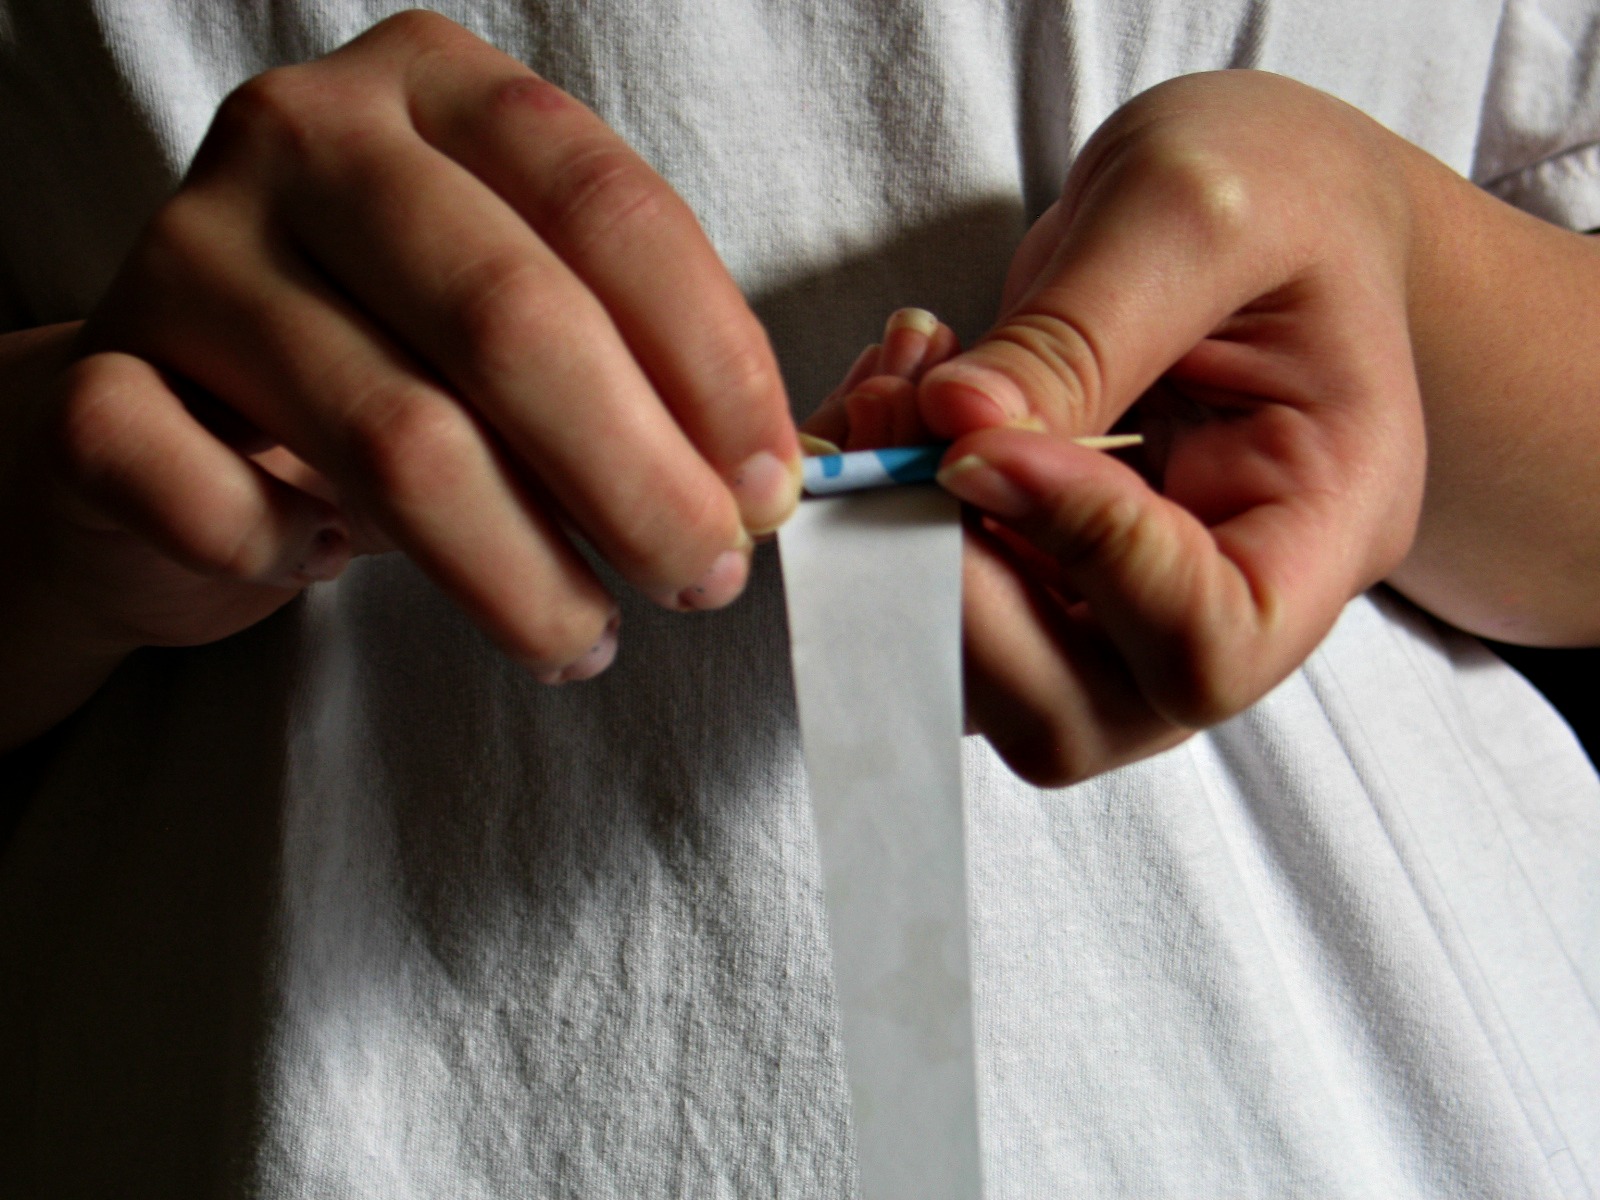
Step 3: Take a thin object----I used a toothpick, but a large needle or smoothed-out paper clip will also work---and wrap the LARGE end of your long, thin triangle around it. Make it nice, even, and tight. Begin rolling the paper, taking care to keep the paper centered. Don't be alarmed if it unrolls repeatedly. Hopefully you will get better as you go along. Let me know if it happens for you---I'm still waiting for it to happen to me!


Step 4: After your paper is all the way rolled, take a little dab of glue and stick down the end of it so it won't unravel. Now slide your bead off and you are ready to make another one.

"Laura picked it up, and it was a beautiful blue bead. Laura shouted for joy.
Then Mary saw a red bead, and Laura saw a green one, and they forgot everything but beads."


Step 5: After the beads are completed, string all of them on some stout wire or string. Make sure it is as wide as whatever you are planning to string them on so the holes don't close off. Paint them with clear varnish---even clear nail polish will do---and let them dry. It will take several coats to get the varnish thick enough.


Step 6: Get your inner designer on and make something gorgeous with your new beads!


I wanted to do a Christmas tree ornament, and had a rough idea in mind. I was inspired by a peacock feather for my color scheme, and I really like how it turned out. But I still don't think you'd look at my ornament and say, "That reminds me of peacock feathers."

I used a variety of sizes, plus I made two pendants by adding another, thinner triangle to the end of my piece to make a really, really long, thin triangle. I also incorporated some clear beads I had on hand.

I can't say enough nice things about this project. It is so fun to take harmless-looking strips of paper and create real beads out of them. And turning them into completed art is even more fun---though I did have to kick my cat out of the "design studio" (read: kitchen) when he wanted to "help."

"The beads made a beautiful string. Carrie clapped her hands and laughed when she saw it. Then Ma tied it around Carrie's little neck, and it glittered there."

So are you ready to see it? My very first paper bead Christmas tree ornament!


Now go make some of your own! You'll have lots of fun and there's no limit to the cool designs you can create---just change the color of the paper to change the color of your beads.

Friday, November 16, 2012

Chapter 12: Fresh Water to Drink


"Next morning Pa marked a large circle in the grass near the corner of the house. With his spade he cut the sod inside the circle, and lifted it up in large pieces. Then he began to shovel out the earth, digging himself deeper and deeper down."

Pa needs to make his trip to town, but before he can go, he must dig a well so Ma will have fresh water while he is gone. Pa cuts the circle into the earth and begins to dig and dig. Laura and Mary must not go near the edge of the well while Pa is digging, but they can see the shovelfuls of dirt that he throws up over the edge.

At last the well is so deep Pa can't throw the dirt high enough to reach the top. He will have to have help from here, so he takes his gun and rides Patty over to Mr. Scott's house to ask him to lend a hand. The next morning at sunup, Mr. Scott arrives to help.

Pa and Mr. Scott make a windlass over the well. It has a handle that turns, and one bucket goes down, and one bucket comes up. They take turns going down into the well to dig; in the morning Mr. Scott digs, and in the afternoon it's Pa's turn.

Every morning before Mr. Scott goes down into the well, Pa sends down a lighted candle. As long as the flame stays lit, Pa knows it is safe to breathe at the bottom. Mr. Scott thinks it's a bunch of nonsense, and one morning, when he arrives before Pa is outside, he begins work without checking the air.

Ma, Laura, and Mary are working in the house when they hear Pa shout, "Scott! Scott!" Then he calls, "Caroline, come quick!"

Ma runs to where Pa is tying the rope firmly around the windlass. He is going after Mr. Scott, who has fainted at the bottom of the well.

"No, Charles! Don't," Ma begs.

"We can't just let him die down there. I won't breathe until I get out."

Ma begs some more, but Pa is firm. He swings into the well and slides out of sight.

After what seems like a very long time, Ma pulls at the windlass and Pa comes up out of the well, hand-over-hand. He climbs out of the well and sits on the ground. Ma sends Laura for some water, and when she gets back, Pa and Ma are both turning the windlass. Slowly the other bucket comes up and Laura sees Mr. Scott slumped over the bucket.

Pa pulls Mr. Scott out onto the grass. He feels Mr. Scott's wrist and listens to his heart. "He's breathing," Pa says.

Pa and Mr. Scott take it easy the rest of the day. The next morning, Pa takes Laura out to the well. He drops some gun powder into the well and lights it. There is a muffled bang and smoke comes up out of the hole. "There, that will drive the gas out of the hold," Pa says.

It takes many more days of digging, but finally there is water in the bottom of the well. When the water comes in Pa almost gets sucked into the muddy slime, and he has to climb out quickly. Soon the well fills with fresh, clean water. Pa makes a strong wooden cover to go over the hole, and Laura and Mary are told they must never touch it. But whenever they are thirsty, Ma lifts the cover and draws a dripping bucket of cool water from the well.

Thoughts:
Gather round, children. It's time for family fun with methane! Oh goody!

Sadly, in the complete absence of volunteers lining up to be nearly suffocated, (I'll just take you to the brink. I promise!) I was forced to look elsewhere for inspiration. It wasn't hard to find; I only had to go as far as the real hero of the story----the lowly candle.

It was the candle that kept everyone safe, and it was in failing to use the candle that Mr. Scott found his life in danger. Candles must have oxygen to burn, and if the well-pit was full of gas, the candle would be snuffed out. Much cheaper than a canary, and not as cruel. Pa Ingalls, the first animal rights activist.

I had a bag of wax shavings that someone gave me, but I was missing a few other key ingredients. Like wicks and something to melt the wax in. In looking up candle making online, I was strictly warned never, NEVER to melt wax without a thermometer. It's best to have a special kettle with the thermometer built in, but at least have a good candy thermometer to avoid over-heating the wax. Which will then burst into flames.

Well, no candy thermometer, and I'm pretty sure that Campbell's soup cans don't come with thermometers built in. But at least I used a double boiler!

Ssh, don't tell anyone, but I got the wick from breaking open a 12" taper I already had. I could have tried to make my own, but I didn't have any Borax on hand. That's my story and I'm sticking to it.


I began melting the wax at a very low temperature since I was paranoid it was going to burst into flames at the first opportunity. Which it didn't. It didn't even melt, really, besides forming a gloppy mass in the bottom of the can.

Building a log cabin would have been faster. It was time to bring the heat.


Once I turned up the heat to a decent level, the water started boiling and the wax started to melt.


When everything was melted I began the tedious process of dipping the wick into the wax. It was even more tedious than usual because for a while I forgot the important step of dipping the candle in water between each dunking. Because the wax was staying hot, it just slid off each time I dipped it again.

I hadn't done this since summer camp about 20 years ago, OK!


After I started cooling the candle each time I dipped it, the wax started accumulating very quickly. "Very quickly" being a relative term....as in quicker than knitting the Taj Mahal with your teeth.


Ah! Done at last. Sure, the candles could have been a bit bigger, but who wants over-weight candles, anyway? I like my candles slim and delicate. Ethereal, almost.

Since I still had quite a bit of wax in the can, I decided to make a snow candle. It was just for fun, since I didn't have a wick to put in it, but I wanted to see what it would turn out like.

Not good.

Evidently, you're supposed to dig a hole in the snow before you pour the wax.


 Well, now I'll know for next time. In the meantime, my parents have some lovely yellow snow in their front yard! I'm sure they'll be thanking me any time now.

"Every morning, before Pa would let Mr. Scott go down the rope, he set a candle in a bucket and lighted it and lowered it to the bottom. Once Laura peeped over the edge and she saw the candle brightly burning, far down in the dark hole in the ground. 

Then Pa would say, "Seems to be all right," and he would pull up the bucket and blow out the candle."

Time to take the candle for a test drive. Was the air in our house fit to breathe? Well, that's debatable in any house inhabited by a teenage boy, but the candle burned, so I guess the air hasn't gotten too rank yet.


You never could have proved it by me....

Tuesday, September 25, 2012

Chapter 9: A Fire on the Hearth

"Outside the house, close to the log wall opposite the door, Pa cut away the grass and scraped the ground smooth. He was getting ready to build the fireplace.

Then he and Ma put the wagon-box on the wheels again, and Pa hitched up Pet and Patty...Pa was whistling while he climbed to the wagon-seat and took up the reins. Then he looked down at Laura, who was looking up at him, and he stopped whistling and said: "Want to go along, Laura? You and Mary?"

Now that there is a nice, strong door on the cabin, Pa turns his attention to building a fireplace. Ma has been cooking outside in the prairie wind, and Pa wants her to be able to cook in comfort. He prepares the ground for a fireplace, then heads down to the creek bottom to fetch rocks.

Laura and Mary are so excited to be able to go with Pa. They see deer, rabbits, snakes, and squirrels. They play in the warm sun along the creek, chasing frogs and watching minnows dart in and out of the shadows. They see lots of mosquitoes, too, but they don't like them!

At last Pa says they can wade in a very shallow part of the creek. Mary doesn't wade for very long because the pebbles hurt her feet, but Laura wades up and down. The minnows nibble on her toes; Laura tries and tries to catch one, but they always get away.

Then it is time to head back up onto the high prairie. When they get back to the house, Pa unloads the rocks and begins the fireplace. He lays a row of rocks down, then spreads the tops and down the inside with mud. He lays another row of rocks on top and does the same thing again. The walls grow taller and taller until they are as high as the roof.

The next day, Ma suggests that Pa do the rest of the chimney using stick-and-daub. He is glad to follow her suggestion because the rocks were getting very hard to lift to the top of the walls. Soon the chimney is all done, and Pa goes inside and chops out the wall in front of the fireplace. Now there is a large opening, big enough for Laura, Mary, and Carrie to all get inside. The chimney is at the top, the front is the cabin, and the back is the rock wall that Pa built.

That night, Ma cooks supper inside. She is very happy.

Thoughts:
Ooooh, I am so excited! I am finally finishing this chapter and am able to move on. I started this back in the spring, but shipwrecked right at the beginning where Pa prepares the ground by scraping it clean. I mowed a spot to work on my project, but before I could do anything, the grass had grown back already. Spring and summer are very busy times around here, and I've spent the past 5 months chopping the weeds in the same stupid spot, never having the time to actually finish. I felt like a hamster on an exercise wheel!

In reading this chapter, I quickly discarded any thought of building a stone fireplace onto my house or chopping holes in it. Poor thing is already falling down; no need to weaken it further! Outdoor stone masonry was definitely the way to go. I toyed with the idea of building a stone bread oven, but ironically discarded that suggestion because "it would take to long."

I settled on a fire-pit, just the thing for cozy marshmallow roasts and crisp spring fall nights. Like I said, the first thing I did was cut the grass around the area. And then continued that for the next 5 months. Finally, a couple weeks ago things settled down enough that I was able to begin making some new progress.

"Laura and Mary played by the creek, while Pa dug the rocks he wanted and loaded them into the wagon."

Caleb and I started hauling rocks from the many rock piles that litter the fields around here. Years ago, when this land was first broken up for farming, brave pioneers hauled tons of rocks from the fields and piled them here and there across the land. When I first moved here, I was reluctant to touch them without the owner's permission. Turns out there was no need to worry---the farmers just laughed when I asked. It had never occurred to them that someone would want extra rocks, but they certainly didn't mind, if I was crazy enough to want 'em.

When starting a stone project, it helps to keep this rule in mind. Haul 3 times as many rocks as you think you'll need. If you do that, you should have to make only 2 or 3 more trips to get more. Thankfully, we no longer have to use a mule and a stone boat....vans are much easier.

I dug out the circle for the fire-pit. It was difficult to get through the initial layer of matted grass roots; when I tried, I discovered that it peeled back in pieces like the old sod bricks. Maybe I'll have to make myself a soddy after all! The cats LOVED the little circle, with its nice, fresh dirt. They seemed to think I was making it just for them.

"First he mixed clay and water to a beautiful thick mud, in the mustangs' water bucket. He let Laura stir the mud while he laid a row of rocks around three sides of the space he had cleared by the house-wall."

Once the circle was ready and the rocks were hauled, it was time to go get the mud. Of course I headed down to the flooded road, an excellent source for all things muddy. It only took a couple minutes to fill three buckets with squishy, aromatic mud. Clay is best for good daub, but if you can't find any, it helps to have a mud that is 10 % dirt, 10% water, 60% pond slime, and 75% duck poop. All that vegetable matter makes it nice and strong, and the duck poop only adds to the experience once you get to the part where you're squishing it between your fingers.


It was getting late by the time we got the buckets back to the house, but I couldn't resist laying down the first layer rock. Then I couldn't resist squishing them with mud and laying down the next layer of rock. By then I could tell we'd have to get more rock, so I had to quit.

It was a couple days before I had the time to haul more rock, but as soon as I could, I was back out there with a bucket getting a bunch more small rock. We'd hauled enough larger pieces, but quickly found that you needed small ones to fit around the large ones; otherwise your fire-pit ends up mostly mud, with a few large rocks thrown in.

"With rocks and mud and more rocks and more mud, he built the walls as high as Laura's chin. Then on the walls, close against the house, he laid a log. He plastered the log all over with mud.

After that, he built up rocks and mud on top of that log. He was making the chimney now, and he made it smaller and smaller."

The next day, Caleb and I freshened the mud mixture and set in to finish the fire-pit. Here is a free helpful hint if you plan on building your own stone project some day: Put your hair in a ponytail----once you find out it's a good idea, it's too late. I didn't take the time, being so eager to get started, and it turned out to be a rather windy day. I had mud on my cheeks, mud on my ears, mud on my forehead, all from trying to keep the hair out of my face. But the fire-pit was coming along nicely!


We built the fire-pit as tall as we wanted, then laid one final row of flat stones across the top. The fire-pit was finished, but you can't complete a fire-pit without an inaugural fire in it. Only problem was that the weather has been so dry all summer it isn't safe to have any fire, even in a beautiful fire-pit. So Caleb and I waited until a windless night and built a fire anyway. Using a tiny little pyramid of tooth picks.

 Even though the fire was small, we had a bucket of water there and the hose going, just in case.After all, it was my own father that burnt a whole wheat field in his youth, after playing with an innocent-seeming candle. I am a firm believer that you can't be too careful when it comes to flames. Still, after dousing the toothpick fire with a five-gallon bucket of water, I think it would have been hard-pressed to muster even a little spark.
"So Ma carefully built  a little fire in the new fireplace, and she roasted a prairie hen for supper. And that evening they ate in the house."

But we'd had our hearts set on a nice hot dog roast. I don't care how determined you are, you can't roast a hot dog over a thirty-second toothpick fire. But that doesn't mean you can't roast hot dogs. Not if you are inventive and don't mind your house warming up anyway.
 
It's been a couple  days since we finished the fire-pit, but the new-fire-pit glow hasn't worn off yet. I really like it and can't wait to use it, even if I have to go out in the middle of a snowstorm in January in order to be fire safe.

I am looking forward to relaxed evenings around the fire, laughing, spending time with family, and building memories. Our fast-paced society is able to summon a world of information and entertainment to our fingertips---all within seconds, but we don't often take the time to be with the ones closest to us. Now, no fireplace will magically grab me, force me to sit down, and make me relax, but if nothing else, I'll have to sit out there and make sure the kids don't burn the world up! That's a form of relaxation, isn't it?

Isn't it BEAUTIFUL!?

Sunday, March 25, 2012

Chapter 8: Two Stout Doors


"After breakfast Pa hitched up Pet and Patty, and taking his ax he went to get timber for the door. Laura helped wash the dishes and make the beds, but that day Mary minded the baby. Laura helped Pa make the door. Mary watched, but Laura handed him his tools."


After his encounter with the wolves and having them surround the cabin that night, Pa decides it is time to build a door. He hasn't done it yet because he is out of nails, but there are other ways of door-building than just using nails. Laura gets to help him because there is lots to do to make a door from scratch.

First, Pa takes the saw and saws the logs to the right length to make a door. Then he saws two shorter lengths for the cross-pieces. After all the pieces are the proper size, Pa takes the ax, splits the logs into slabs, and smooths the rough wood nicely.

He lays the long boards on the ground with the short boards across them, then takes his auger and bores holes through the cross pieces and into the door slabs. He drives wooden pegs into the holes and the door is held together.

He makes the hinges out of three straps of leather fastened to the door with pegs, and to the strong door-frame with more pegs. He makes the door latch out of a long, smooth stick that can be moved up and down by pulling a string if you are outside and by using your hands if you are inside. If you wanted to keep someone out, you could pull the string back through the door and there was no way for them to get in.
It is a very good, strong door.

The next day Pa goes hunting because they are out of meat, but the day after that Laura and Pa make the door for the barn. It is made just like the first door, except with no latch because Pet and Patty don't know how to use one. Instead, Pa drills holes through the door and barn wall and fastens a stout chain with a strong lock. No one can get into the stable and no one can get into the house.

"Now we're all snug," Pa says.

Thoughts:
I don't know about you, but after this latest project I'm starting to get a little suspicious about the accuracy of some of Laura's recollections. Like Pa building a door start-to-finish in one day---I mean, I could see a week or so, but one day? I'm not so sure....

Our chapter begins with Pa suddenly getting religion when it comes to solid doors. I'm sure Ma had felt the yearnin' for quite some time, but nothing like a pack of giant wolves around your wiffle-ball house to inspire a man to bump security to the top of the to-do list.

And to be fair, I can totally understand Pa's side of things. He didn't have any nails left, so it was easy to put off door building until he had a chance to get to town for the proper equipment. But sometimes life demands we forge ahead without the ideal setup, and in true pioneer spirit, Pa met the challenge with skill and flair.

As hard as it is to believe in this age of instant assembly, a great deal of the world's lasting creations were made under very primitive circumstances. It was, and still is, possible to build  many things without using nails in the process. I decided to carry on this noble pioneer tradition by making something using nail-less construction. Of course, I'm not crazy, so I wasn't about to start out with something hard like a door---making a little footstool was a big enough challenge for a beginner such as myself.

I didn't worry about having the right tools for the job. See, I have a very special father. He has taken for his personal life motto the phrases, "What if?" and "You never know...." He's never met a tool he didn't like, and once he gets his hands on them, they're prisoners for life. Evidently, somewhere in his past, he decided that "What if?" would probably involve building a log cabin from scratch someday, so all I had to do was borrow from his knowledge and store of equipment.

My footstool-to-be


I began with my wood in its most virgin state---well, not quite virgin---the tree had fallen down last winter and part of it was already cut into short sections. I selected a log I judged to be the right size and began the process of splitting it to make a board.


This may surprise you, but I am not actually that skilled with an ax, so the log resembled a toothbrush on each end by the time I got done hacking at it. Once I had a deep enough cut in the wood, I was able to fit the wedge in and begin hitting it with a sledgehammer. This may surprise you, but I am not actually that skilled with a sledgehammer, either. I broke the handle by overshooting the wedge and slamming the wood of the handle down on the iron wedge. Repeatedly. I'm glad my dad loves me!


First one side of the log split off, and then the other. I was left with a thick, rough wood plank just the right size for a cute little footstool. That was the first day.

The next day I began my work of smoothing the board. The rough work was done at first with an ax, but I whined my way out of that as soon as possible. This may surprise you, but I'm not actually that skilled with an ax....still. My arms were killing me, too. No need for Pioneer90X---you burned your calories in honest labor back in those days!


After my shrill keening convinced my dad that the board was smooth enough to move on to the next step, he got out his sculptor's adze for me to use in the smoothing process. A full size adze is like an ax on a hoe handle and used standing over your work, but this one was for handwork use. It helped smooth the ridges in the board and take out the largest splinters, but even with that, you'd still need protective padding before you'd dare sit on it.


When my arms couldn't take it anymore, I took a break by sawing the legs off of  branches from my parents' woodpile. It still used my arm muscles, but at least they were different ones! That was the second day.


These are the tools I used in creation of my footstool. Of course, the ax, sledgehammer, and wedge were used in cutting the board out. The other tools are (from the top down): a saw, a draw knife (R), a brace-and-bit (L), a plane, calipers, a ruler, and (L) a pocket knife.

On the third day I began the final work of smoothing it . My dad had told me that in pioneer times, before the invention of sandpaper, they would smooth the roughest parts of the board, but then (especially for floors) they would drag a heavy stone back and forth across the boards until the floor was safe and smooth. Let me tell you, you would have kept your boots on at my house, because this whole sanding-with-a-rock thing is a real drag! It does work though, and my board almost didn't look like a porcupine before I called it good.

Everything was now in readiness for the detailed hand-working. The labor moved into my dad's man-cave--his heated Garage o' Wonder. I clamped the board to a sawhorse and smoothed it still further using a plane and then the draw knife. The draw knife is pretty cool...you lay it almost flat to the board and then pull it towards you, shaving off little whorls of wood as you go.

The board was ready; now to prepare the legs. I clamped each stick by turn to the sawhorse and used the draw knife to trim the bark from one end and to smooth out any bulges that would get in the way of placing the legs properly. Then I sawed a little slit in each end to fit the wedges in when it was time to assemble things. This was the third day.


On the fourth day all my labor got to come together into a finished project...at last! First I used the calipers to measure the circumference of the ends of the legs. I needed to know what size of bit to use to drill each hole, since the legs weren't all one size. Then I used the brace and bit to drill holes in the seat of the footstool, another great opportunity for growing my upper body strength.


After the holes were drilled, it was time to install the legs. To help keep the legs nice and snug in their holes, I was using a wedge construction. It is done by cutting a slit in the end of each leg, then placing a wedge into the tip. When you hammer the leg down into the hole, the wedge is driven in the rest of the way in and spreads the wood so that it fits very tightly inside its socket. Sadly, this meant I had to cut out wedges. This may surprise you, but I am not actually that good at cutting wedges. They were more like chunks. Hey, square is the new taper! At my dad's insistence, I kept at it until I had 4 passable wedges, which I then trimmed to fit the depth of the hole and width of the slit.


Good! Now I was finally ready to put this thing together! Just in case the perfection of my craftsmanship might be a little bit lacking, I slathered the legs with glue before I pounded them into their holes. And no, I didn't make the glue from scratch. I felt I'd achieved quite enough authenticity for one project.

Voila! Pioneer perfection using no nails. But half a bottle of Gorilla Glue. Does that still count?


So what did I learn this time around? Well, for one thing, I learned when doing wood work it is best to spread your legs wide. You end up with an awful lot of very sharp things swinging towards some very sensitive areas.  

I also learned a little about how much the value of things have changed. In pioneer days a little girl or boy would have been delighted to receive this little footstool as a gift. They would know that it represented hours of hard labor poured out simply out of love for them and they probably would remember receiving it all of their lives. If I gave it to a kid today, they'd look at it for a second and ask, "Where's the cord?"


In our culture today, if something breaks or wears out, we throw it away without another thought, in full confidence that an anonymous foreign worker in a far-away sweatshop will make us another one. Through this project, I've discovered how much pride and sense of accomplishment we've lost in that system. My footstool is seriously flawed, and until I get the legs trimmed evenly, rocks back and forth like a rocking chair. But I am prouder of it than almost anything else I've ever made. I took a raw piece of wood and wrested a (semi)functional piece of furniture out of it. That is really cool! Much neater than going to the store and getting a mass-produced one that would last a week before breaking.